IGCSE · 25 September 2026 · 6 min read
IGCSE Physics lens questions: construct and explain the image
A lens diagram is a construction, not a picture copied from memory. Its purpose is to locate where rays from one object point meet, or appear to come from. Getting that point right lets you describe the whole image: its position, orientation, size and whether it can form on a screen.
These original IGCSE practice examples use a thin converging lens and rays close enough to the principal axis for the standard school model. You can solve them with the diagram and a stated scale; no advanced lens equation is needed. Draw with a ruler and keep actual rays distinct from dashed backward extensions.
Set up the axis, lens and both focal points
Draw a horizontal principal axis and a vertical lens. Mark the optical centre where they cross, then place F at the same focal distance on each side. Mark 2F if it helps locate the object and image. Draw the object as an arrow perpendicular to the axis. A scale must apply consistently to horizontal distances; use the scale required by the question.
Use rays from the top of the object to locate the top of the image. Mixing one ray from the top with another from the base would combine light from different object points and produce a meaningless intersection. Each principal ray is a convenient representative from the many rays leaving that one point.
Construct two rays and explain what they show
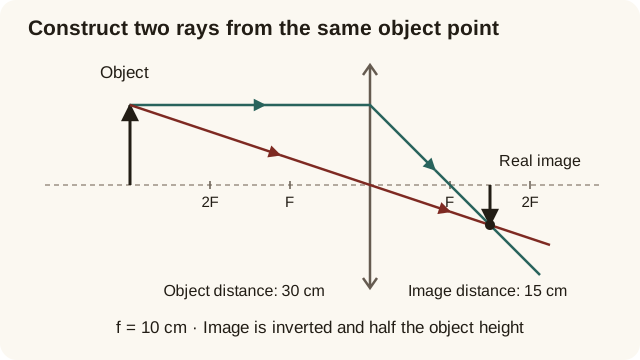
The first ray travels parallel to the axis until it reaches the lens, then refracts through the focal point on the far side. The second passes through the optical centre without changing direction in the thin-lens model. Continue both until they intersect. An optional third ray travelling through the near focus emerges parallel to the axis and can check the construction.
Add arrowheads to show light travelling from object to lens and onward. Refraction changes the ray's direction at the lens, not at the focal point. The focal point is not a physical obstacle that bends the light again. Straight segments and clearly positioned intersections matter more than making the lens symbol decorative.
Worked example: a real image smaller than the object
Take a converging lens of focal length 10 cm and place a 4.0 cm tall object 30 cm from it. With a horizontal scale of 1 cm on paper representing 5 cm, mark F 2 cm from the lens and the object 6 cm away. Construct the parallel ray and central ray. A careful scale drawing places their intersection about 15 cm beyond the lens, with image height about 2.0 cm below the axis.
The image is real because actual emerging rays meet; inverted because its top is below the axis; and diminished because 2.0 cm is less than the object's 4.0 cm height. The magnitude of magnification is image height / object height = 2.0 / 4.0 = 0.50. The position between F and 2F is a useful check for an object beyond 2F.
Worked example: a magnifying glass produces a virtual image
Now put the object 6.0 cm from the same 10 cm focal-length lens, between the lens and F. The parallel ray still emerges towards the far focus, while the central ray continues straight. These emerging rays spread apart, so they do not meet on the far side. Extend them backwards with dashed lines on the object side until the extensions meet.
The intersection gives an upright, enlarged virtual image on the same side as the object. With an accurate construction, its distance is about 15 cm from the lens and its height is about 2.5 times the object's height. A screen placed at that apparent image position does not collect converging emerging rays. An observer looking through the lens sees the image because the eye traces the incoming light back to an apparent source.
Avoid shortcuts that break the ray construction
Do not send every ray through the focus. Only an incoming ray parallel to the principal axis follows that particular rule for a converging lens. A central ray continues straight instead. Similarly, do not draw a real ray backwards through the lens to create a virtual image: dashed extensions indicate where rays appear to originate, not an extra path actually taken by the light.
Image size and image type are separate descriptions. A real image can be enlarged or diminished depending on object position. A converging lens therefore does not always magnify. If your two rays miss the expected region, check the focal-point spacing and ruler alignment before forcing an intersection where you remember an image should be.
Independent practice: use symmetry and then check it
A 3.0 cm object is placed 20 cm from a converging lens of focal length 10 cm. Predict the image before drawing. Because the object is at 2F, the image should be real, inverted, the same height and 20 cm on the other side. Construct the two rays to verify this: the image's top should be 3.0 cm below the axis and the magnification magnitude should be 1.
After checking the answer, redraw the situation with the object farther away. Predict a smaller image closer to F before drawing it. Record whether an error came from a ray rule, a scale or the image description. Revisit that specific step with a fresh distance later rather than repeatedly copying one familiar diagram.
Questions, explained
Choose a question for a direct answer, then explore the explanation and supporting resources. Each answer has its own link to save or share.
How do I tell whether a lens image is real or virtual?
A real image forms where actual emerging rays meet and can be projected onto a screen at that position. A virtual image forms where backward extensions of emerging rays meet; the rays only appear to come from there. Draw actual rays as solid lines and their extensions as dashed lines so that the construction shows the distinction.
Does a converging lens always make an image bigger?
No. With an object beyond twice the focal length, a converging lens makes a diminished real image. At twice the focal length, the image is the same size. Between F and 2F it is enlarged and real; inside F it is enlarged and virtual. The object position determines the result, so construct the rays before deciding.
Which two rays should I draw in an IGCSE lens question?
A convenient pair starts at the top of the object: one parallel to the axis, refracted through the far focus, and one through the optical centre, continuing straight in the thin-lens model. Both rays must come from the same object point. Their meeting point, or the meeting of their backward extensions, locates the corresponding image point.